If you are citizen of an European Union member nation, you may not use this service unless you are at least 16 years old.
You already know Dokkio is an AI-powered assistant to organize & manage your digital files & messages. Very soon, Dokkio will support Outlook as well as One Drive. Check it out today!
Korlu. J, Adeola Adeniyi, Rafael Baez, Fernando Burgos
Super flash
Project Description:
As people become more and more dependent on their phones and use them very often, the battery life of the phone begins to diminish and for the reason we have decided to create a hat the charges your phone using solar power from the sun and also uses LED lights for you when you are outside when its dark outside.
Problem or issue being solved:
In today's generation we depend on our phone in our everyday life. Without our phone today's generation will sincerely be interrupted and confused. Therefore when our phone dies and we don't have a charger, what do we do? We begin to freak out, cry, and feel lost because the one thing that we depended on the most is now dead.
This is the reason most people do not usually like to leave their homes until they're fully sure that their phones will not die. This form of heartache could be prevented if we just had a hat... a hat not only fashionable, but one that can actually charge our phones for us. Not only does this hat charge our phones also it also can be used as a flash light while walking outside when there is no light. That way, people do not have to be frightened or scared. With this invention, people will no longer be afraid to leave their house, in fear of their phone dying. They will be more inspired to go out and see the neighborhood. Also not only is this invention encouraging, it is also Eco-friendly!
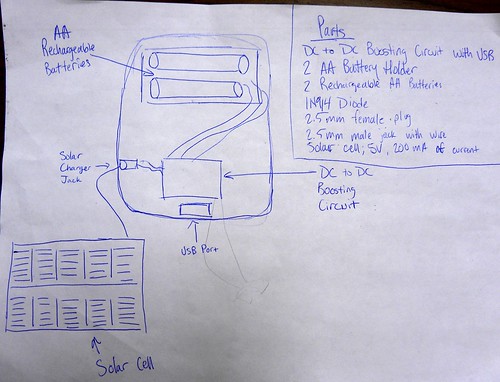
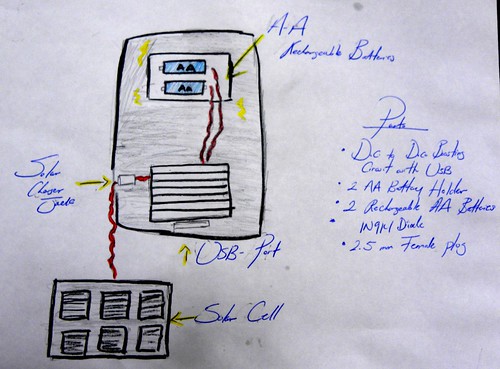
Materials:
- Conductive thread : The reason why we need to use conductive thread is because in order for the LED Lights to work they need to be connect to the wire and with that the lights would work
-Hat: This was the idea we decide to incorporate since ex member form L2TT2L already created a similar project like ours.
-9V Enercel: We would need a 9v rechargeable batter
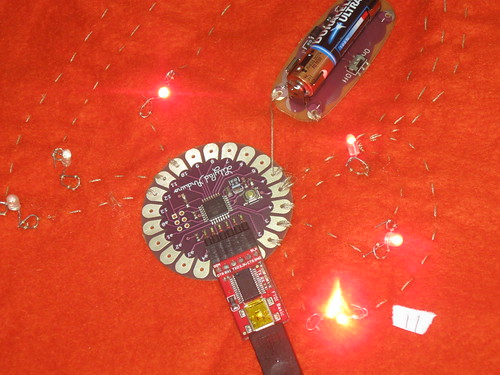
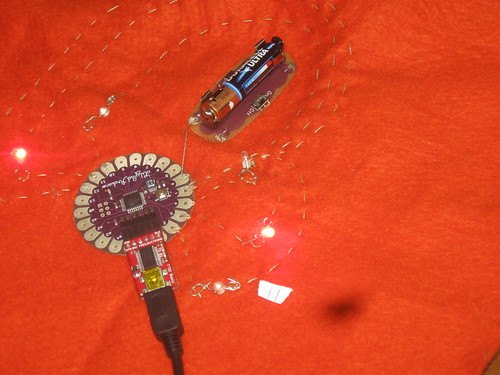
-Lily Pad: the Lily pad is there to hold the program that we build so that it can flow with the pattern that i programed.
-Arduino: it's a program that we used to program the lights to come on and off and have a pattern to it.
-LED Lights: This we be more like a fashionable design to fascinate people to purchase the item and to have a new style.
-Female Plug: will be used to as a sources to recharge the battery
-male Plug: it's the source to get solar energy from the solar cells, which will then be connected to the female plug
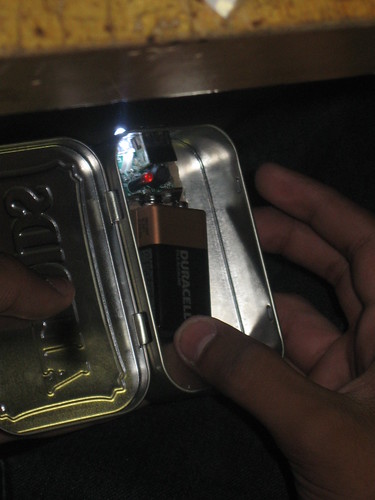
-Altoids: the container that holds all the electrical equipment that will consist of the charger
Pros:
This hat is artistic and innovative.
The idea inspires kids to save energy and GO GREEN.
This hat inspires people to go outside without being in fear of their battery dying.
The hat will give a fashionable flare.
The LED lights turn on in the dark.
Cons:
The hat can't be worn in the rain because it's not waterproof.
Too much wiring could be an issue with certain people.
The hat will work using electricity and people will be concerned about the idea of electrocuted.
History:
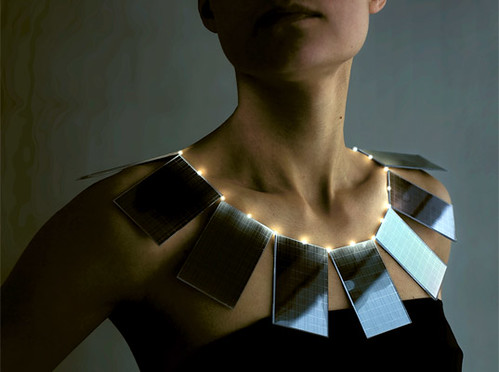
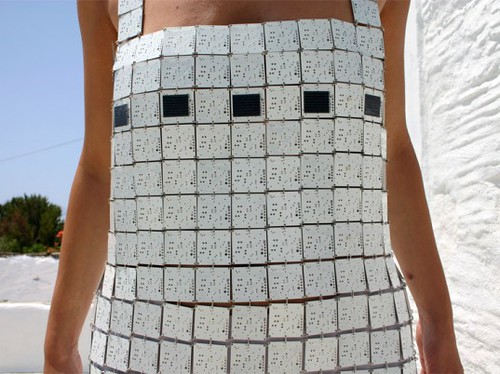
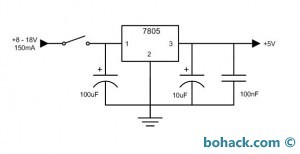
While we were deciding what type of project to do, we saw that Phi, one of our college mentors, made a project similar to what we were trying to create and we thought that it would be cool to use some her ideas and then add in some of ours to make it better. She had made a charger that used the motion from a windmill to then create electricity which then powered the charger. An inventor made a phone charger (http://www.bohack.com/2010/08/phone-charger-using-a-7805-voltage-regualtor/) similar to ours, and we decided to make it better by adding lights and incorporated a light sensor into our design. The light sensor is suppose to detect whether it is light or dark outside. It's been a big problem for many people to charge their phones outside. So we decided to create a charger that was fashionable and creative; something society would like and would save energy. We were inspired by the different projects that we looked up. For example, the " IPhone 4 / 4S External solar powered battery charger" made by "Apple" (http://www.amazon.com/gp/product/B0087NN6W6). It's very light weight and could be used as a case. The Solar Altoids Charger was very straight forward and it was something we could create. We went around asking the college mentors if this was a project that we could accomplish and many of them told us that an ex member from "L2TT2L" had done a similar project like this but it would be nice if we could incorporate another idea. As a group we decide to add something that could give a fashionable touch, like a hat with LED lights. Not only do they light up they are also programmed with certain patterns using Lily Pad, a form of physical programming, which is programmed with Arduino.
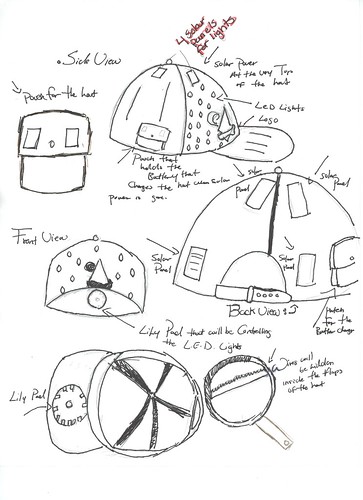
POCKET: the charger sits in a pocket on the hat while the phone chargers.
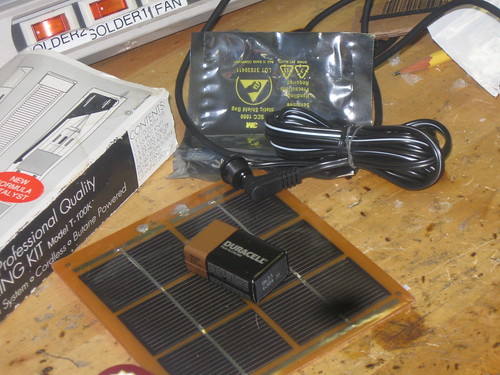
SOLAR PANEL: the solar panel power the charger
LIGHTS: The LEDs on the hat provide light for when its dark and scary out.
Lily Pad: the lilypad is the divice we are using for physicalprograming. The input of the lily pad is the light sensor, and the output is the pattern light set. We programed the lilyPad using the java-like Arduino programing.
"Arduino is a single-board micro-controller and has a software suite for programming it. The hardware consists of a simple open hardware."
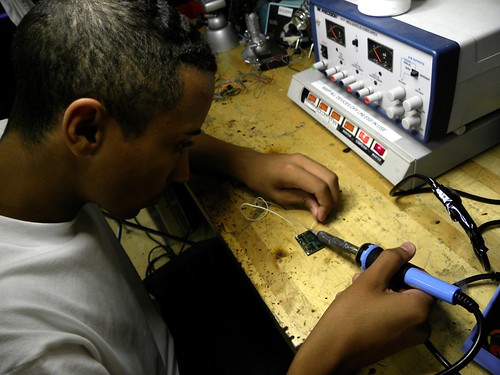
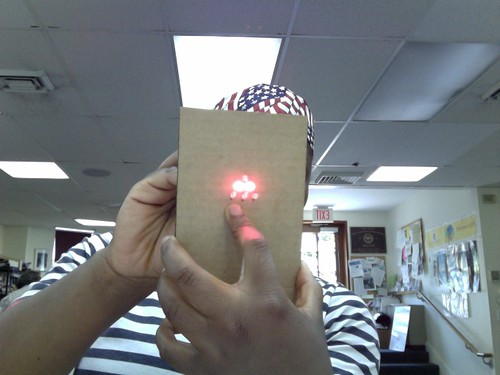
KORLU: well today my goal was to get the LED lights to come o. in doing so, i had to make sure that all the + and - on the LED lights were in a row and the connect them together with the solering.. i had to work really careful to make sure that they do not touch.. so far out of all the things that i used the cardboard seems to work the most and its stable to hold everything together
my team went to get things from the store with David
The trip to Radio Shack:
Adeola: Today me Rafael and Fernando went to Radio shack to pick up the following
Female USB
A tipe connector
An energizer 9 volt battery
7805 voltage regulator
One 100 uF of electrolytic capacitors
One 100 nF capacitors
*Rafael and Fernando are making the soldering board that will go into the Altoids case
Talk to Ed about how to improve for lily pad and battery
Working on design for the hat- Korlu
Work on wiki page- Adeola
*******Korlu
Purchased the hat from urban Outfitters
Working on how to design hat with the logo created
*****Rafael and Fernando
Hook up the solar panel to male plug
Hook up the battery to the male plug
****Adeola
Work on design for the logo (fab lab)- (Ink scape)
Written email to Pamela J.King about sewing embroidery
**Letter to Pamela King by Adeola
Dear, Pamela king This is Adeola from the SETC and I was wondering if you could please help us embroider the hat that we are going to be using for our group project since none of the college mentors here know how to. Your help would be very deeply appreciated by us. Thank you!. We are open for your help on Thursday, and the whole of next week, please feel free to come in whenever you want between those time in order to help us. Thank you!
Work on learning to teach with Dona
***Using the the theme of Scratch,
Day 7- July 17
To do list:
Work On Wiki page
Meeting with college mentors and Susan to discuss the whereabouts of our project
Finish work on hat by
Training teaching with dona
*figuringout where the L.E.D lights will be going
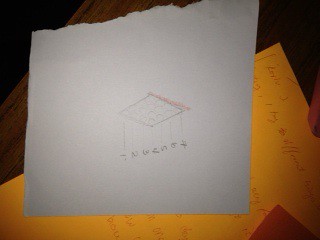
* Drawing a Diagram of the hat
*Finalizing the designs
Fernando:
Soldered
find rechargeable battery
Rafael and Korlu:
Feels as though today we worked on our communication skills as a team , which in fact is very important
Korlu: Learned new teaching skills
Adeola:
Work on diagram by drawing out the designs on how it would look from the back
and the front
Working with Dona to learn new teaching skills
Meeting With College mentors
Day 8- July 18
(Thursday) Day 9-July 19
To Do list:
Work on parts for presentation
Work on logo with Ms.King
People from the Mel king institution came in for a meeting today about how
Goal :
Make our own board
Work on spreadsheet
Rafael- helping korlu
Korlu- Two different colors L.E.D ***research order
Fernando- Wiring portable charger
Adeola- Embroidery ****diagram ****Colors
Adeola:
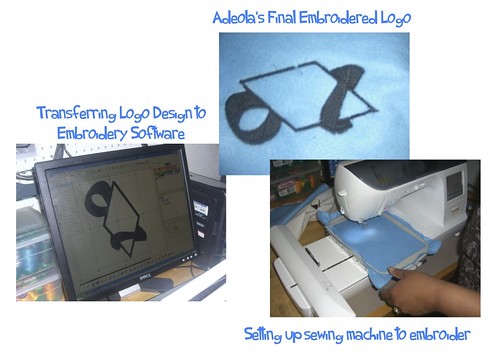
Today I actually got the opportunity to work along side Ms.King for the first time today. I was very excited to meet her and as soon as Ms.King came in we got started right on introducing ourselves then started on the embroidery together. Ms.King first showed me the working area for the sowing machine (which I can't believe I never noticed before), and then showed me how to set up the embroidery part. I had much fun watching the process of the logo being imprinted into the fabric for it was my first time and a completely new experience for me. This part of the day actually inspired me to start working on sowing more because it made me remember the days when I was younger and loved to play with fabric.
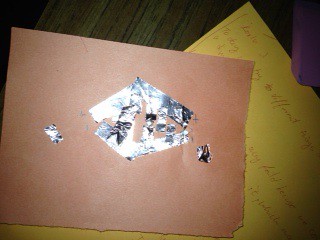
<-----------The Design I made with Ms.King
(Monday) Day 10- July 23
Goal:
solder all the LEDs together
connect the wires to the LED
update the wiki
complete the diamond
5. try to make the pocket (if we have time)
(Rafael and Fernando)-THE CHARGER IS COMPLETE!!!!!!!!!!!!!!!!!
**Korlu:
Today, as I was going through my email, I was inspired of our hard work and what people think about it. We are encouraged by what people say to us and it motivates us to do better.
**Adeola:
Today Rafael and I worked on the things that need to be fixed for the wiki page. Today, we added the Pros and Cons
for our project and also edited the material list and added some more supplies that we used.
I also attempted to work on The embroidery part of The project but sadly forgot the instruction, so I emailed Ms.King to come and hep me tomorrow with the the embroidery.
Email Sent to Ms. King:
Hey Ms. King!
This is Adeola just wondering if you were still coming by to help me with my embroidery, anytime of the day is fine with me.
(Tuesday) Day 11-July 24
Goals:
Work on Embordery
Work On Wikipage
Adeola:
Instruction Given to me By Ms.King:
Here are some instructions for you to try to do this yourself.
1. Turn on sewing machine and attach the USB cord to the computer (which is located in the drawer bin under the table) turn on the computer and make sure you select Microsoft Windows XP
2. At log in the password is: fab
3. On the desktop you will see MW icon for MasterWorks-click on it to open the program.
4. Go to File to open current document: select diamond.pes
5. Once open- you will be able to resize the image as you would any image. click on it and then use a corner point to resize.
6. Save as diamond.pes.blf.v6 and send to E: drive.
7. Go to the sewing machine and follow the instructions on the touch screen to initialize the machine. Place the fabric and stablizer in the hoop and attach to the machine. Use the following instructions to upload the image to the sewing machine.
8. Touch the icon that shows the 2 prongs with arrow.
9. select the image, thentouch the icon as shown in the image.
10. Now that the image has been uploaded you can proceed to embroider the image.
11. Lower the presser foot lever located in back of the machine. The red light will turn to green to start.
12. Machine will stop when it has completed the pattern.
*************I had a bit of trouble following these intruction but managed my way through all the way to step 8 which is when the Machine began to show some malfunctioning. Therefore because of this I called Ms. King (With the help of Susan) to come by today and help me with the rest of the instructions and though she was able to come by, unfortunately we could not finish the embroidery because the machine was still proceeding to showing some major glitches.
Korlu Jallah: 8/1/2012
Today, i worked on sawdering the lights and i'm almost done. only have one more to do do. i have the LEDs in a parallel pattern.
I found out that the resisters makes on set of the lights shine low while the other shines bright.
August 8,2012
Today we hooked up all the LEDs to the conductive thread. While doing that, Alex told us that we could do it a much simpler way by using thinner wires to hook up to the Lilipad and solder them on.
Alex also said that we had to create a voltage circuit.
August 10, 2012
Today we came in to work on our project and finish any work that hasn't been completed yet. We are working on the final aspects of the project.
August 13, 2012
Korlu Jallah
Today I went to look up how many volts it would take to power about 20 to 24 LEDs.
Today Rafael Adeola and Korlu work on the charger, we tested the battery after we charge it with the solar panels. Adeola was a great help she was holding the wire in place for Rafael to solder them. Korlu did a fantastic job making sure if the solar panels were functioning. Since we had to teach at 1 we didnt have enough time to work on the hat but hopefully the hat would be completed before the project expo. The reaction my team had when we completed the charger was breath taking :0.
August 17 2012
Today Korlu and Rafael work on the LED lights for the hat. We wire wrap all the wire that where hook up to the LED and the Lily Pad. Alex showed Rafael and Korlu a better and neat method which its called "wire wrapping" it much easier and fun. We accomplish so much today we feel happy that the only thing we have to do is program the Lily Pad.
Your expressive and heartfelt description made me smile! Your diagrams, photos are great! One suggestion is to organize how you tell who did what each day. I know you were working in pairs today and did a number of things that are not documented here (searching for electronic parts and ways to get them quick!) and you need just a little more explanation for me to understand what's being described. Ask me and I give you a few tips! Susan
Make sure you are taking turns with updating wiki and working with technology hands on. All team members need to experience both writing and hands on work with technology!


Comments (3)
Learn 2 Teach Development Trail said
at 12:29 am on Jul 12, 2012
Your expressive and heartfelt description made me smile! Your diagrams, photos are great! One suggestion is to organize how you tell who did what each day. I know you were working in pairs today and did a number of things that are not documented here (searching for electronic parts and ways to get them quick!) and you need just a little more explanation for me to understand what's being described. Ask me and I give you a few tips! Susan
Donna Parker said
at 4:13 pm on Jul 16, 2012
Make sure you are taking turns with updating wiki and working with technology hands on. All team members need to experience both writing and hands on work with technology!
Learn 2 Teach Development Trail said
at 7:12 pm on Jul 18, 2012
Yeah for getting some communication skills --- that's as important work as any building! Susan
You don't have permission to comment on this page.