For Gordan
Wheel-up-Chair (Three Wheeled Wheelchair)
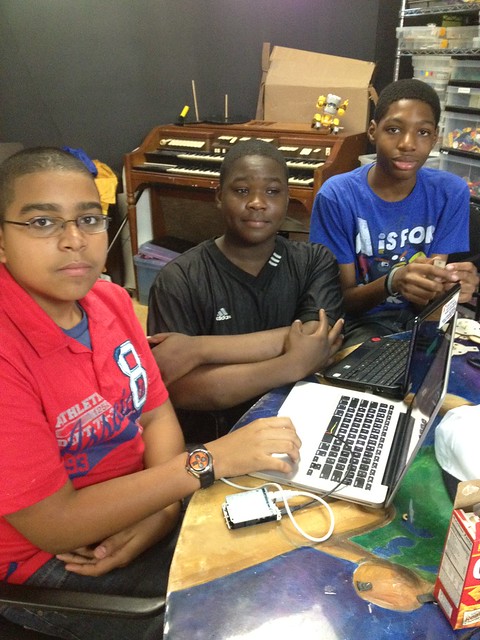
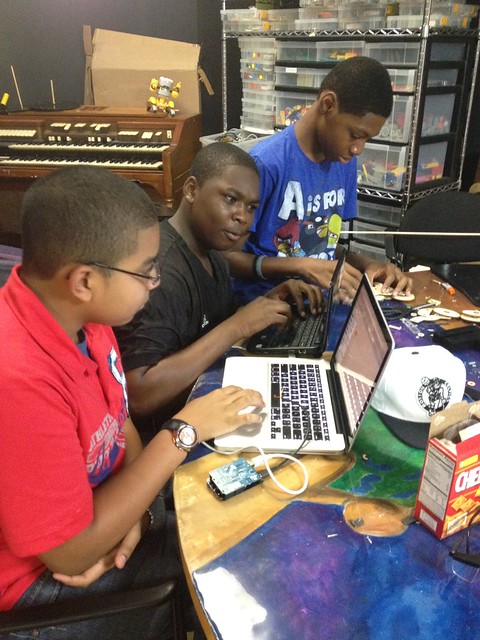
Team Members : Cedric Mendes, Naeem Wilson, Gordon Guerra
We are looking for editors
If anyone is interested call us via skype
Click the Skype icon to call or add xcoder62 or nemodude1 as a friend on Skype
Even if the Icons above say Offline, We are always online from 7 AM to 10 PM.
Our goal : Our primary goal is to create an efficient wheelchair that will allow handicapped people to cross over sidewalk curbs on our efficent wheelchairs, without having the wheelchair fall over. We want our market (Handicapped, Wheelchair users) to have a trustworthy wheelchiar that they could always use. This way, Their family members will not have to worry about their grandmother, or grandfather falling off their wheelchair when they try to go over a curb and staying incapacitated on the ground without the help of others. Our secondary is create a solar powered accessory that will act as either a back-up charger for the wheelchair or completely power the wheelchair without having to worry about the wheelchair dying from the paucity of electricity.
Abstract
As susan stated that we needed to chose our projects soon, I became nervous. I did not know weather to create a house that could charge an iPhone or assist in creating a wheelchair for people who are paralyzed from the legs down or people who just can't use their legs. As I continued to ponder on my decision, I thought it would be awesome to create an object that would charge anything that uses USB port to charger, however many other groups were making a device that charged iPhones and other objects that charger via USB ports. Now it seemed to me that it would be a redundant project expo if everyone had something that functioned the same way. So I decided to assist Naaem in creating a wheelchair. The wheelchair seemed like a very difficult design especially since the design was only inside of a video game, however we never let that postpone us from creating the inevitable. We decided to break up the project into three parts
- Create a Lego prototype of the three wheeled wheelchair that would show off the mechanics of how the wheelchair would work.
- Create a Wooden Prototype that would show us how much weight the whole structure would support proportionally, and see if the mechanics would work with the prototype and to see how the actual design would look like
- Finally, Create a Final Acrylic Prototype that would be half the size of a normal wheelchair with all the mechanics that were used before.
We have worked our hardest to make this design work out for everyone. To see how our wheelchair turned out, Continue reading this wiki, I'm sure it will be worth your time.
Pros & Cons
Pros
The wheels are original
• Our project will help handicapped people
• Legos were able to support us in seeing how the final prototype would look like
• Legos allowed us to see how the mechanics would work
• The Design of the wheelchair was from a video game
• The wheelchair is able to go over 6-8 in curbs and more
Cons
• The first wheelchair design was only created in a video game, so it was Very difficult to convert a wheelchair from a video game to a real life wheelchair
• The design is very complex, if someone were to use the same design from scratch they will have a hard time recreating our design.
• The motors of the wheelchair are not as strong as a normal wheelchair
• The time it took to come up with the design was very long
• The wheelchair requires many wheels
• The final product is only 1/2 the size of a full wheelchair
• The final product is mostly made out of acrylic and may not support one person.
• It may be hard to mass produce these types of wheelchairs without a factory that mainly focuses on manufacturing the wheelchairs.
• The wheelchair might be a little bit bumpy however the person who can't use their legs will not fall off the wheelchair.
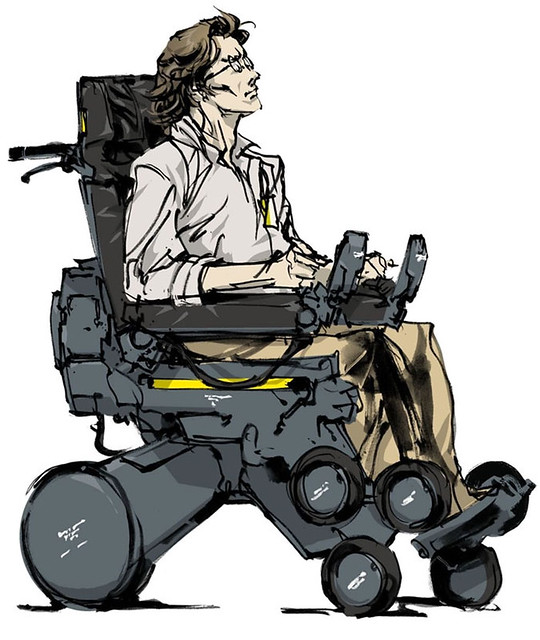
The Inspiration was from a video game named Metal Gear Solid Peace Walker. Huey Emmerich was born a paraplegic, unable to walk because his spine was abnormally shaped. As he was studying MIT he came up with a specially designed wheelchair, which was technologically-advanced for its time, one of its features being the ability to travel up stairs and downstairs and be able to completely carry his weight without falling over.
Image of huey and his wheelchair here:
We wanted to create something similar to his design but on a smaller scale. So the first thing we though about that made his wheelchair dynamic to others were the wheels on his wheelchair. These wheels we shaped into a triangular shape and could move over curbs and stairs with ease. The only problem we had with this, was that his wheels were made in a video game, meaning that the exact same copy could not be created, so we had to find an alternative to this. After 2 days of researching, we were also ready to give up on the wheelchair until we found this:
- Added bag charger idea onto our drawing board
- Added Concept for the bag charger
- Added main feature (mobility) to the bag charger idea
- Researched how to make our product into a keychain.
- Created a gimp image of the product would work (gimp image lost)
_____________________________________________________________________________________________________
- Decided that the design of the product would look like a house
- Named our project House Project
- Discussed concepts and ideas that would make our house more pleasing to look at.
- Dropped the solar paneled charger idea because many groups are working on solar paneled chargers.
- Discussed more ideas for our primary project as decided that a wheelchair will be our primary goal
- Discussed ideas for the wheelchair project such as what is the purpose for the wheelchair, how will move, how many wheels we will need for the project.
- Created a lego prototype of how the product would look like.
- Began the wiki page for our group
_____________________________________________________________________________________________________
- Added sections to the wiki page (Our goal, To do list, Update log; day 1,2)
- Base is updated and completed
- Four Big Wheels (12 regular wheels) were added to the base
- Completed prototype
- Pico Motors were added to the prototype
- Pico Motors were removed and replaced with LEGO MINDSTORM
- To do List is updated
-
_____________________________________________________________________________________________________
- To Do list is updated
- Added Day 3 and 4 Section to the wiki
- Lego prototype sections were added; Base, Wheels, Completed prototype,
- Added a "Some ideas are left better unsaid" was added to the day 3 section of the wiki page
- Music Sweden.ogg was found for the prototype music.
- A draw out the youtube page has been created.
- Lego Mind Storms Programming has been completed
- Tested Lego Prototype with programing
We begin the share ideas for our project,
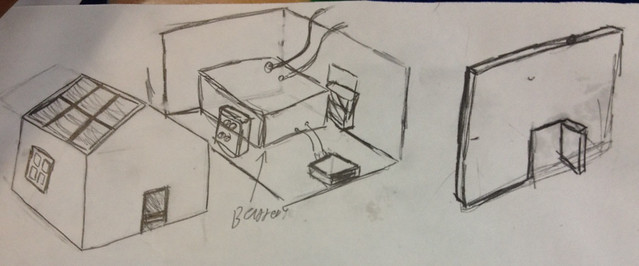
We wanted to create a product that would be physical attached to a bag, however in order from other projects we decided that the charger would be needed to be converted into an accessory that could be connected onto any bag with a custom keychain and be able to charger iPhones by using solar panels that would be connected to a usb port. A gimp image of the product should look like was lost.
As we began to talk about how our product would look like we came across some ideas
- The House would look like a normal house
- The House will be 3-D
- The house should be made out of colorful acrylic.
- The Windows of the house would be where the LEDs are placed
- The Door would be where the usb port would be placed and the door would be close-able and open-able.
- The Rooftops of the house would be the solar panels that would be linked to the door and the windows.
Here is our drawing of what the product would look like:
We needed to drop our solar powered house charger concept, because too many groups were working on devices that could charge any device. This was a major downfall for our team however, we still came up with other ideas that would allow us to hopefully produce a product that all of us could be proud of.
With our Solar paneled house charger accessory out of the story, we needed to find a new concept quickly, over wise, we would be behind ever group and not have enough time to finish the project. So Naeem has thought of an idea for a wheelchair that will allow handicapped people to cross over the hedges of the sidewalks. This idea initially came from a PSP video game titled Metal Gear Solid Peace Walker. The character, Huey, was accidentally exposed to radioactive material that paralyzed him from the waist down. He created a wheelchair for himself in order to go up stairs and down stairs. The specs of the wheelchair were as followed:
-The wheel chair contained 7 wheels, 6 in the front and 1 in the back
- The wheelchair is able to support a human being.
- The seat of the wheelchair was made out of leather.
- The seat has two hands that allow the user to move forward.
Here are two examples of how the wheelchair looks like:
We were beginning to ponder about who we would take something from a video game and make it into a real life object. We also wanted something was that not the exact same model as the one from the video game, So we began to create a lego prototype.
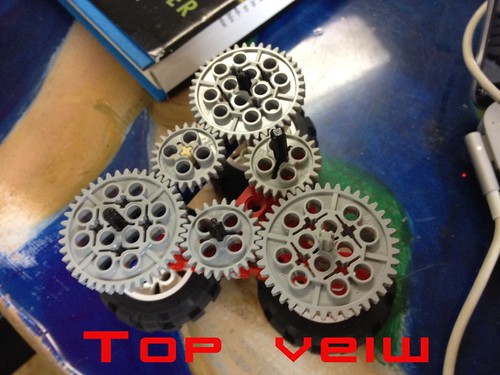
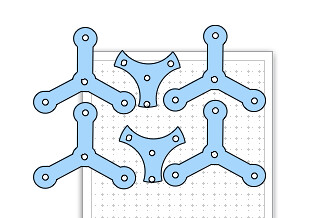
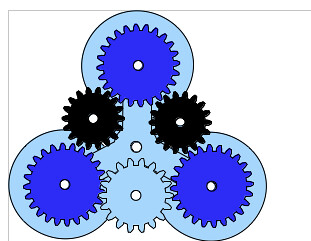
We began on building the wheels, We figured that three wheels connected to each other, could be combined into one big wheel.
The images represent the wheels of the prototype at different perspectives.
Gears view of wheels:
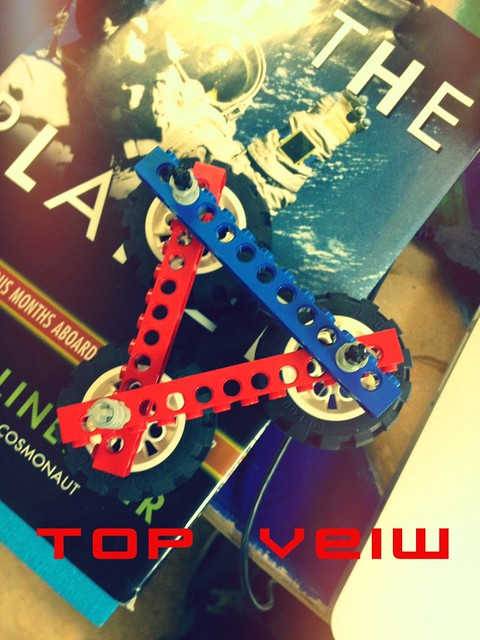
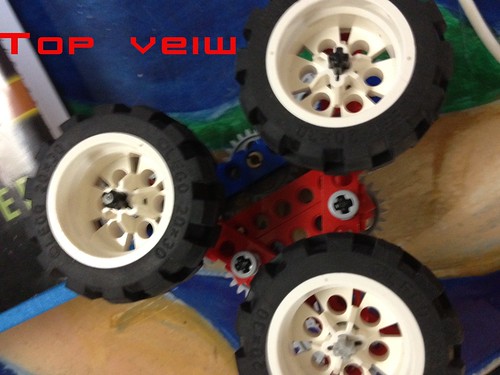
Top view of wheels 1:
Top view of wheels 2:
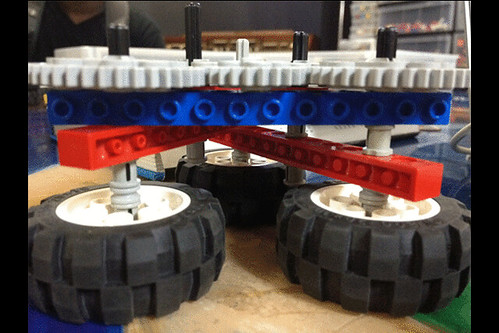
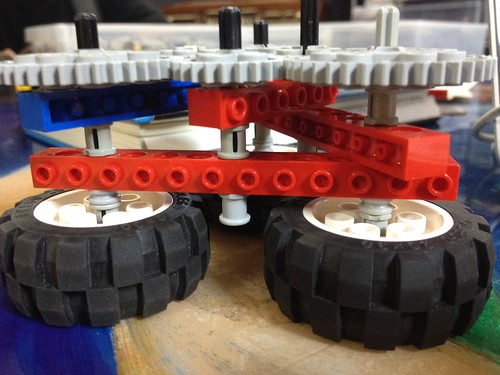
Side view of wheels 1:
Side view of wheels 2:
Side view of wheels 3:
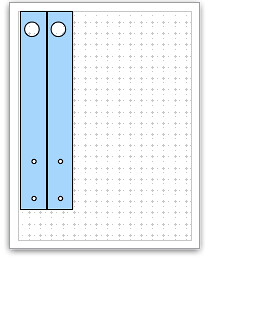
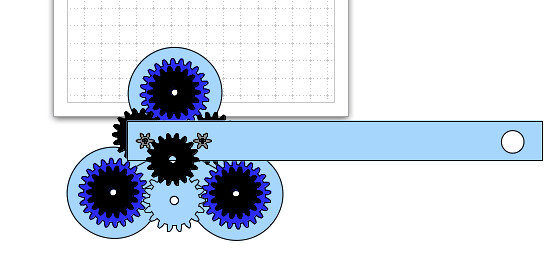
After we built the complex wheels, we began to start on the base. The base was large and recatangular and allowed space for the gears of the wheels to fit in. The base also allowed 4 big wheels (12 regular wheels) to be attached to the corners of the base.
After many hours of work on the prototype, we decided to end the day with the wiki page being updated. We also checked our to do list and noticed that we needed many pictures and videos of our project to be done. All we needed to do for the rest of the day, was wait for tomorrow...
Most of the day was spent working on the wiki and thinking of ways to make this wiki stand out from other wikis. For example the Headings like the one above were used to interest the reader on what might have happened today. Near the end of the beginning day, when Naeem came in, he decided the prototype be altered completely. He wanted to wheels to be less complex and the base to be smaller. Cedric wanted to keep the design the same, and continue to innvotate the design that we had.
However the design was taken apart and many random ideas came into mind on how to build a new prototype for our wheelchair, however none of the designs worked and we decided build the old design and continue to improvise on the design. About 1 hour was wasted on trying to find a new prototype design, however that is the past and we needed to continue on creating the prototype more efficiently.
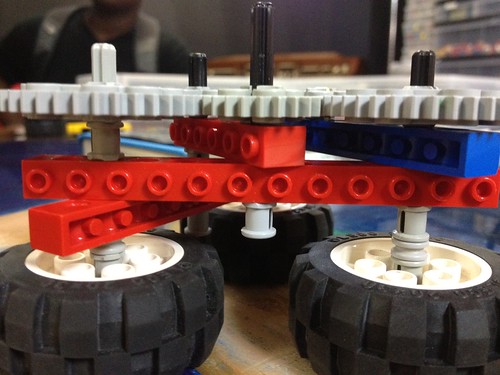
Our Completed prototype consists of four big wheels, and a big rectangular base to hold the wheels in place.
A few images of our prototype:
Top view:
Side View:
Front View:
Diagonal View:
The pico motor is unable to use engoigh power to move the wheels because the wheels were too big for the pico motor to hand. Now we needed to enprovise, We needed a bigger motor that could move our prototype, so we used a LEGO MindStorm Motor to move to the wheels. The motor was able to move the wheels however, the force was too much for the wheels to handle. We knew that we could program the LEGO MindStorm Motor, so we decided to leave the programming for tomarrow.
As I began to update the wiki with stories about what happened yestarday, I noticed that I wrote in a manner that seemed as if I was actually talking to someone... to the reader. So I decided to tell Naeem about the Wiki Page in order to make sure that we were on the same page
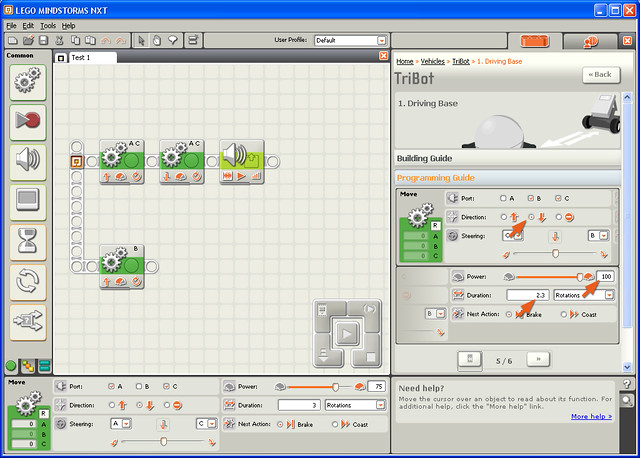
"For now and on, the wiki page will stay the same format as it is now, a story about what happened that day, that includes pictures and videos of what happened", That's what I told naeem when he arrived this morning. He agreed with the idea and we began to program the LEGO MINDSTORMS NXT.
When we started the Lego Mindstorms program, It was a program similar scratch however, this used a graph that allowed the user to place command blocks that would command the NXT mirco Computer which acts as the brain for the robot. After using the quick-start tutorial of the program, We both understood the gist of how to use to program. So with a few move commands and picture commands (these were used to show us that the program was running without any errors.) We created a program that would move the motors at 40% power in order to move the wheels smoothly. 20% power is too weak to move the wheels and 100% was too much power and almost broke the wheels.
The image represents our program created in the Lego MINDSTORMS NXT programming:
With our Program finished, we decided to only test it once outside, and here is our result:
VIDEO
In conclusion, our final prototype was very sucessful, We configured the motors to work at 40% and when it was time to show off our project, we hoped that the project would move correctly because we only tested our prototype once. As the NXT Mirco Computer sent power the motor, we noticed that the wheels spinned once and the screen (on the NXT Mirco Computer) did not show an image (meaning that the program was not running correctly). Everyone began to laugh, I also began to snicker, however Naeem seemed worried about the prototype. Naeem forced the NXT Mirco Computer to send power to the Motors once more, and our Prototype began to move continuously and our screen showed a smiley face, which meant that the program was running perfectly without any errors.
Our prototype went over a few shoes with ease and did not fall over onto it's back. Everyone enjoyed how our prototype worked and it was easily one of the most favored Prototypes. Now we need to start thinking about how we are going to build a real wheelchair, what materials will we need, and will we need to create another prototype for the chair of our wheelchair? All of these questions will be discussed on Monday, July 16, 2012.
Today I was told that Gordon will join me in the mornings and after-noons. I told him about the project, show him a few examples from this wiki page of what the project should look like, it seemed liked he understood what we meant, but in the end, I could not find him something for him to do. This reminded me about what happened with my initial group, There were 4 members who knew what they were going to do, However I wanted to join their group. They did not know what I could do for them so I was labeled Unimportant, Useless, and unvital to the project. I was avoided by the group, and even told in person that I was unimportant to the group. It is true that I may not have the appropriate skills needed to work in the fab-lab, or the programming skills to program the robot. I am always open to learning new things, which is the reason why I keep my notebook with me, and yet I was still considered unimportant to the group, a eventually officially banned from the group. The college mentors stated that they did not know why I was not wanted in the group, However, I knew why, which also meant that they definitively do know why I was banned from the group, maybe they did not want to hurt my feelings, but now none of the events that were justed stated above is important, It's the past, that I do not wish to carry, but inevitable I have too.
GORDON -" The day i joined the group i got the meaning of the project,
Now my Mission to get Gordon to get some work done for the project before he gets officially banned from the group too. He may or may not take offense to feeling unimportant among your peers, however, I know that 3 people efficently working on the project will be more benefical to the project than just two people working on it.
Today was just used on researching, We researched how the mechanics of the wheelchair work, what type of motors we needed, and how can we design the looks and feel of the wheelchair. These are some of the links that we researched:
finaldesign.JPG
http://www.youtube.com/watch?v=ZqHiW7Q7_bw Wheelchair development
$(KGrHqV,!lcE-lETJkBLBPy7DM84)g~~60_57.JPG other wheelchair model
http://www.youtube.com/watch?v=sRIBZFlxGIw steeper motor, showing off SKIP TO 8 mins
http://www.youtube.com/watch?v=sIZQgwuOXzA servo motor
http://www.youtube.com/watch?v=yuxZfUVQFwA 2700 rpm
http://www.youtube.com/watch?v=z1sgR82cD34 gear reduction tutorial
http://www.youtube.com/watch?v=D_i3PJIYtuY&feature=related gear physics tutorial
http://www.teamdavinci.com/understanding_gear_reduction.htm gear systen reading
http://www.ebay.com/itm/Wheelchair-Motors-Wheels-Charger-/230824232173?pt=LH_DefaultDomain_0&hash=item35be3244ed#ht_500wt_1219 wheelchair motor 1?
http://www.ebay.com/itm/Permanent-Magnet-DC-Motor-High-Torque-24-V-Wheelchair-Scooter-Robot-Go-Kart-/270920711698?pt=LH_DefaultDomain_0&hash=item3f1421fe12 wheelchair motor 2 requires a lot of gear reduction
http://homepage.cs.uiowa.edu/~jones/step/ controling steeping motor
http://www.youtube.com/watch?v=AKd5VcCfOXI&feature=related Video of the VERY USEFUL WHEELS
Wheelchair Donations:
http://neatmarketplace.org/store/wish_list.asp
http://www.chariotsofhope.org/electricchairs.html
http://www.wheelchairfoundation.org/
http://www.freewheelchairmission.org/site/c.fgLFIXOJKtF/b.4916275/k.BE91/Home.htm
http://www.lifenetswheelchairproject.org/pls/apex/f?p=224:39:0::NO::P39_STATE_FILTER:MA
As the researching of motors began, I came across two motors that can be used for our project, servo motors and stepper motors, steeper motors seem to be a bit better than sego motors, we are still not sure on whiter we should get a whole wheelchair or obtain , In the end we wanted a full sized wheelchair to work on. As david stated "For I-bed, we did not make the bed, we used a bed created by someone else to add innvations to the project." "For now David thinks you should work on the mechanics of the project." We understood what he meant by work on the mechanics but we were still on the topic of building the final product and getting a real sized wheelchair. However it was getting late and we decided to chat over Skype to discuss the plans for tomorrow.
Or so we thought that they were. Out of all the research that we had done today we came down to the top three Notes that could potentially help us with our project
3. [Insert wheel motor pic here]
We would use these motors on the bottom of the frame of our wheelchair in order to move gears that would move an axle with would case our wheel to spin. We plan on programming the wheels with arduino/Modkit. What needs to be done now is learn how to connect a DC motor to a arduino board, which board do we need, and will the motors be powerful enough to move the gears.
2.VIDEO
This is a tutorial on how to created a basic wheelchair model that uses a couple of wheels, metal pipes that were designed to hold a plastic chair and a few wheels. We plan on useing this design if we never get a wheelchair that we could use.
1. http://www.youtube.com/watch?v=AKd5VcCfOXI&feature=related (sorry Embeding was disabled by the user)
This video is a PERFECT model of what the wheels and the frame for the wheels should look like. Their project was something that was used to lift up heavy objects easily. It seemed like we had everything figured out at that moment, but then we had 1 problem.
The frame for the wheels seemed easy to design, however in the end we never designed it perfectly. We did not know how to copy the exact design from the video in order to improvise on our project and make it work for our project.
This was the last design:
As soon as I arrived home, I logged onto skype and called naame. He answered, however he had to do something first and hung up. when he called back, we began our business cal and After our Business call, we have decided to do the following things tomorrow.
- Learn Press fitting in order to create a new prototype.
- Have gordon work on the project
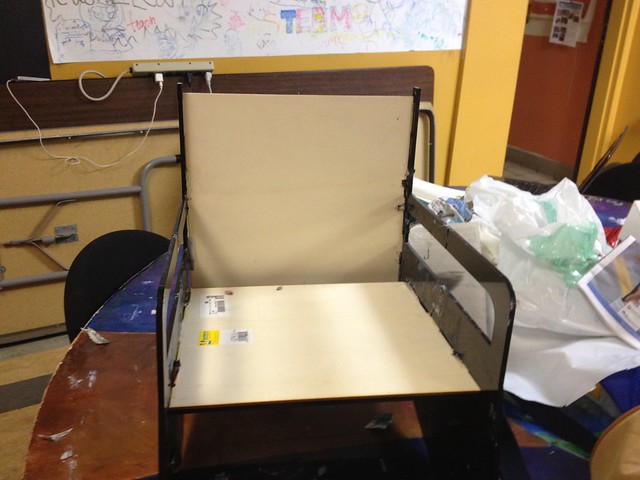
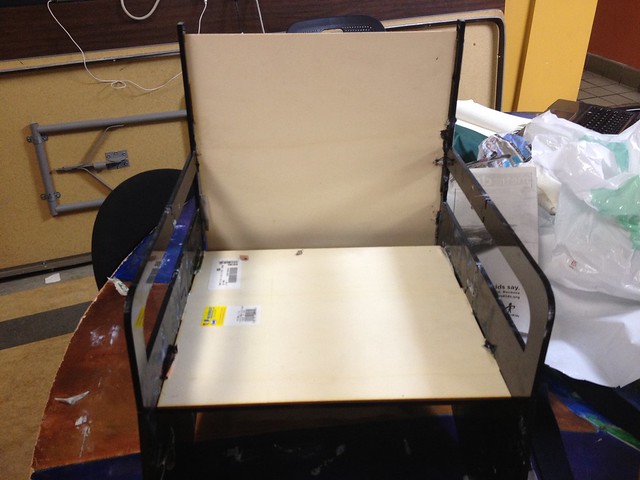
When Gordon came in this morning, we wanted him to do something productive for our group. So I asked him to create a press fit house prototype that could have all the mechanics attached to it (such as the battery, LEDs, ETC). He seemed confidant on creating a simple house and began to work in the fab lab right away. However It seemed as if his confidence got the best of him, because at the end of the day, He created two Press fit pieces that could connect together. This was good, but it did not make the house that we wanted. When I had asked him why he could not create a house, he said that he was new to it. If I had known this before, then I would have given him another job, such as learn programming, or learn how to use the servo motors.
My whole day was just spent on learning how to use the fab lab. So far, Press fitting and usage of the laser cutter was learned. I did have experience with the vinyl cutter, but since I did not put that experience down, I had lost my knowledge of it. No one in my team knew how to use the shop-bot, however we made learning how to press-fit a priority for the day.
Here are some of the designs me and gordan have tried to create before Naaem arrived:
[{images go here]
In the end, when Naaem came in from school, I asked him for additional help. The key to Press-fitting was to make sure that the height of the blocks were the same as the thickness of the material. With the simple rule, everything about press fitting was easier, now the only thing we needed was to design the blocks that would be connected and make a wheelchair.
The Design of the wheels were created, however, the wheels were too big to fit the frame for the wheels so we had to create another design that would fit the wheels.
David stated today that Ming would help us with our project. We explained to him what we wanted our project to do. So, he recommended for us to do another prototype of how the mechanics would work. So Naaem created a LEGO Prototype showing us how the servo motor would work to not only allow the wheels to more like a normal car, but it would allow the whole frame to move without having the wheels move. This would allow the whole design to move over a curb. It seemed like a good idea, however we now needed to learn how to convert this design into a acrylic and servo motored prototype. In the end, we just created that prototype and updated the wiki the whole day.
After work, We decided to create two prototypes on Little Big Planet to see how the prototype would be created into real life. It seemed easy enough to create a prototype in a video game that is based off of real life. Here are our Designs of the wheelchair from Little Big Planet
After listening through lectures and presentations for three hours, we had to go to attend a meeting. They asked us about our project and what we have done and what we might have needed. Me and Naeem explained that we did understand what our project was going to be about, the only problem was designing it, we did not know how, and we had to go through 1 and 1/2 weeks of just trying to find the right design for our prototype, after many, many, many designs, we still did not discover how to perfectly create our project with all the mechanical pieces together.
We were then told to work more efficiently next week on getting the perfect design because next week would be the last week of having efficient time with our project. Now we were both worried, we had many different designs, but we still needed one that we could show off to everyone. I wanted to tell them that we needed DC motors but I held off on that note because I thought servo motors were like regular motors. We were then told that we had to share our progress with everyone before the end of the day, so dropped creating the designs and starting to work on the lego mechanics before the "Show and Tell" event happened.
When we began to design the mechanics, we decided to create another wheel prototype in order to show off how the wheels should acutally work. The new prototype with made strictly for the wheels and we had created something simliar to the old prototype but with a few changes.
- The wheels would have a level attached to the axle.
- Driving mode: when all 3 wheels move individually
- Curb mode: when all the wheels stop rotating and only the axle moves the frame of the wheels in order to move over a curb.
Before "Show and Tell" we needed to have something to say before we go up and show our project, speechless. So, I had an idea, I thought that we should create scripts for ourselves, so that we would remember what we needed to say. However Gordan suggested that we could just describe the design without having any scripts at all. In conclusion, we ignored the scirpt idea. When the presentation began Gordan stated to the crowd that our team name was wheel up chair and we were building a three wheeled wheelchair. Naeem explained the goals of the wheelchair and how it worked, and I explained what the technologies are and how the technologies were used. After the presentations we continued to work on the project until everyone became tired and went home.
It is the final week of designing and we wanted to finish off this project before we go onto teaching week. However, there were a few problems, Teaching practice started this week so we had less time to actually work on the projects. Today's teaching pratice was in the afternoon, so we had all morning to work on the project. We edited our wheel design from the last one, and made a final model. All we had to do now was create the gears, holders, the chair for the wheelchair, axle, and a holder for the motors. We also needed to find a way to program the servo motors and the DC motors. In order to create the gears, we needed another program called Inkscape, however, by the time we downloaded Inkscape it was time for lunch, which meant that afterwards the teaching pratice session would begin. So we will continue our Process tomarrow.
The Teaching Session had happened in the morning and It was the second week of our final week of building and we though somehow we would get a working prototype by today. However, that was not the case, There were too many distractions such as people wanting to know other's age and people wanting others to become "assertive". The distractions basically left us with an hour to work on the project. Not only were the distractions bad, but the proportions of the project were not correct, most of the designing had to be redone in order to match with the project's expectations (being able to carry a few motors and move without falling over). Now it just seemed as if the lego prototype was just made to boost our moral up about building the actual wheelchair. So after we had the completed design with all the correct measurements, it was time for cutting.
The time it took for the design to cut was about a couple of hours, but in the end we had one huge error. The cuts were made out of cardboard. We were forced to use cardboard because this was our test cut, However cardboard can bend easily which makes it a bad material to use for something that is supposed to move on its own. The gears were also bending easily which made it harder to make the wheelchair move, so in the end, we had to start over again, tomarrow,
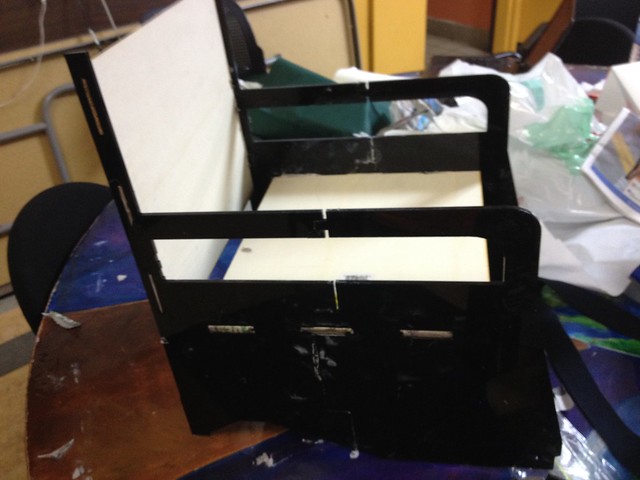
Here are some of the images of our design:
As the days continue to go on, we had fewer time to focus on the project at hand. Teaching real children today began and it took most of the day, so we had to work overtime in order to have more time for the project. Even with the overtime we still had less time to work on the project. So, after lunch and teaching small children, we immditatly began to cut out the design, but this time, we cut it out on wood. We wanted an acrylic that was not used, however, the materials that we could use that were not used before was either cardboard or wood. The wood was thin, however we though that we should aleast try and see if it would still work with our design. In the end, the laser cutter was able to successfully cut out the wheels, the frame for the wheels, and the diodes for the wheels. Now all we needed to do was to design the chair for the wheelchair and cut out the diode holders, Gears, and holders for the servo motors. We still don't have our regular motors, but we can just though that we could leave that for later. At the end of the day, we cut out of the design that we had.
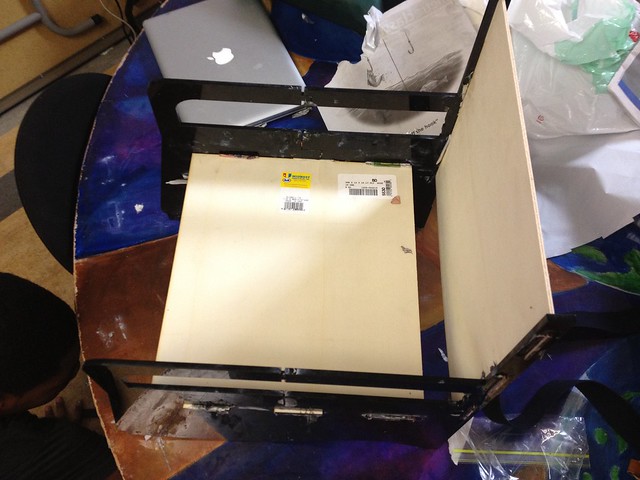
After Yesterday It is the last day of Project building week, and the next week would lead onto teaching week, which meant that most of our time would be used to teach students either in the tech center, or out in other center. All of our Designs were inside of a flash drive, however the flash drive was left home. So we had to improvise for the rest of the day. We already the wheels cut out including the frame and diodes. So all we needed was chair of the wheelchair, the axles, and the gears. However since we did not have the flash drive, we needed to spend most of our time redesigning our project. After abbout an hour an a half, we redisgned the gears, and the chair of our wheelchair. So as we began to the cut the pieces out on the laser cutter using plywood, we assembled the pieces that we already had from yesterday and waited for the laser cutter to finish our design.
When the Gears were cut out, we noticed another huge problem, the plywood was so thin that the wheels would fall over even with support, and the gears were too thin to move the wheels. So now, we had to find another material to create a test cut. The only problem was that we were not allowed to use a plain sheet of acrylic that was not used because, in order to use an unused sheet of acrylic, we needed to show our prototype. So now, we needed to change our design to fit into certain pieces of the Acrylic, however was already 5 PM and decided to continue on tuesday.
This morning I decided to clear out the DC motor issue and ask for DC motors. I looked through the jameco website to find a DC motor with a gearhead on it. This motor was help us use our gears more efficiently,
Today, We wanted to change up the design of our project. Our design for the frame of the wheels was unable to stand on it's own. Only me and Naaem were able to work on this project because We were given the whole day to work on our project. However, LibreOffice was a bit buggy. Libreoffice did not allow us to create a perfect equilateral triangle which would allow us to create a new design. So we continued to try diffrent designs until we found the perfect one for our wheelchair.
Here are the parts of our design:
Servo and DC motor Holders:
Wheel Chair Frames:
Gears:
Wheels:
Holders:
Semi-Complete Design:
All the parts in one page:
Completed Design:
It took about three hours just to find a new design that would work, but this design seems like it would be able to stand on it own. Our next objective is to print out the things in the fab lab, however since we could not get a plain sheet of acrylic, we needed to find a way to use the acrylic in the fab lab or buy a whole new one with our own money.
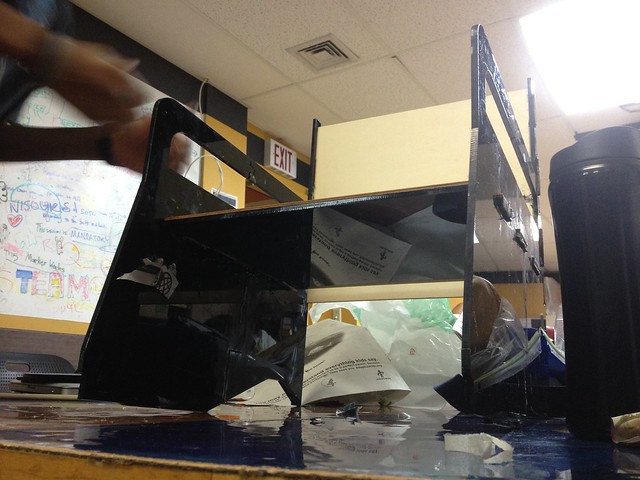
We were now on the look out for clear acrylic that we could use for our project. David recommended us to use the left-over acrylic and just reduce the size of the design but, reducing the size would take a lot of time and it would be hard to find the left over acrylic. So we began to research places that sell acrylic, The closest place that sells acrylic is the J. Freeman, Inc. distributor in dorchester. (click here to visit their website) However we needed an acrylic that was about 23 inches by 11 inches. This would have cost us about $200, which was way over the budget. So we decided to just use plywood instead acrylic.
This is what we have printed put from the plywood:
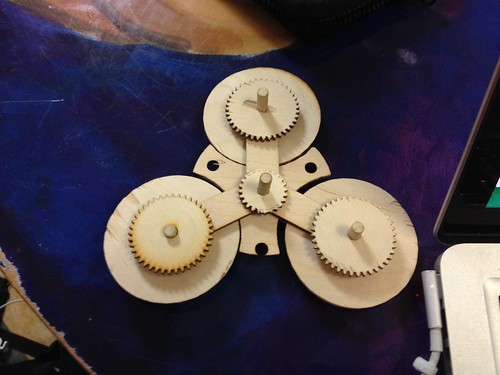
The middle gear was not cut correctly by the laser cutter and the design was a bit ricky but we decided to keep the design until we printed out the complete the design to connect the wheels to the wheelchair. We wanted to perfect the wheels and the chair tomorrow however teaching days were here and we had to prepare each day in order to make sure that we were ready to teach kids.
The project expo approches as the days keep passing by. So we immeditly continued with the design and got more the gears done and seeing how the wheels would fit together. Altough we were pretty close finishing the wheel design we still needed a legitimate chair design that would go with the design of the wheel. So I decided to start creating the house part of the project. It's still a work in progress, however I understand how I would be able to press-fit the chair. So far, I decided to delete my design until i think of a better one.
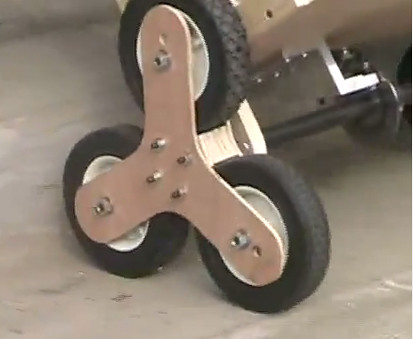
We needed more Diodes in order to combine all the parts of our front wheels together. So we asked Susan to go to the
Utrecht Art Supplies in order to buy a diode that would fit the holes of our front wheels. Susan allowed us to go to the Utrecht Art Supplies with stacy and we brought a few diodes because we forgot to bring our own front wheel to test out on which diode we needed. When we got the diodes we realize that only one of the few diodes we had were able to fit inside the hole of our project. So the diodes that we did not need was donated to the fab lab since we had no use for it. The one diode that we did needed was cut in the fab lab to meet the size of our front wheel. With the diode cut into pieces it was now time to put the diodes onto the front wheel. We placed all of the pieces of the diodes into the holes of the front wheel and this is what we came up with:
Now that we had our front wheel completely finished, we needed to start working on the chair of the wheelchair.
Day 15, August 14, 2012
4 Days left with no physical chair on sight


Comments (2)
David solomon said
at 10:37 am on Jul 14, 2012
http://www.instructables.com/id/Tree-Climbing-Robot/?ALLSTEPS (possible motor)
Donna Parker said
at 4:11 pm on Jul 16, 2012
So proud of you for taking on the challenge of helping people with disabilities. Important work!!
You don't have permission to comment on this page.